You may download a PDF of the presentation here: Docker for Web Hosting 101
Docker, and likewise Linux containers, have taken the development industry by storm. Legacy applications are being re-packaged as micro-services to break away from the heavy application installs and complex dependencies. Although lots of developers already use Docker on their machines for application testing, it’s not always clear how Docker applications should be configured for a production web hosting environment.
I’m Dan Healy, founder and systems engineer for Healy Technologies. I’ve accomplished an electrical engineering degree from Old Dominion University as well as a master’s of IT and Systems Engineer from University of Maryland University College. My experience includes technical leadership with the Johns Hopkins University enterprise web hosting team and architecting a Docker-based web hosting replacement for student and faculty websites. I also serve as a Senior Systems Engineer for Clever Devices LTD where I provide senior leadership and direction for multi-million dollar public transit technology projects.
In this demo, I’ll teach you how to create a 3-node HA Docker Swarm cluster with a shared storage, container registry, and a reverse proxy. We’ll also discuss some best practices for logs collection.
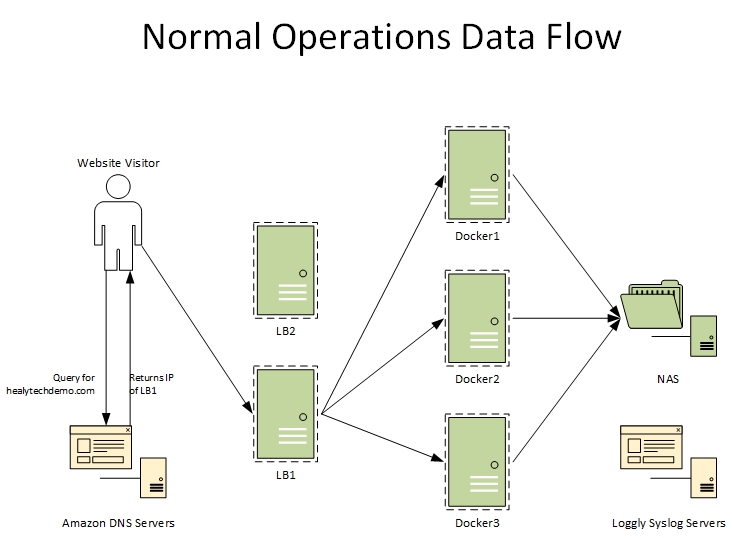
Normal Operations Data Flow
- Website Visitor queries website<x>.healytechdemo.com
- AWS DNS replies with IP of primary load balancer (LB1)
- Website Visitor directs HTTP to LB1
- LB1 proxies traffic to active Docker servers
- Docker server proxies traffic on port 80 to Nginx container
- Nginx inspects header for virtual host and proxy pass to website container somewhere on Docker cluster
- Website container retrieves files from NAS and database from database container
- Docker will push logs off-site to Loggly
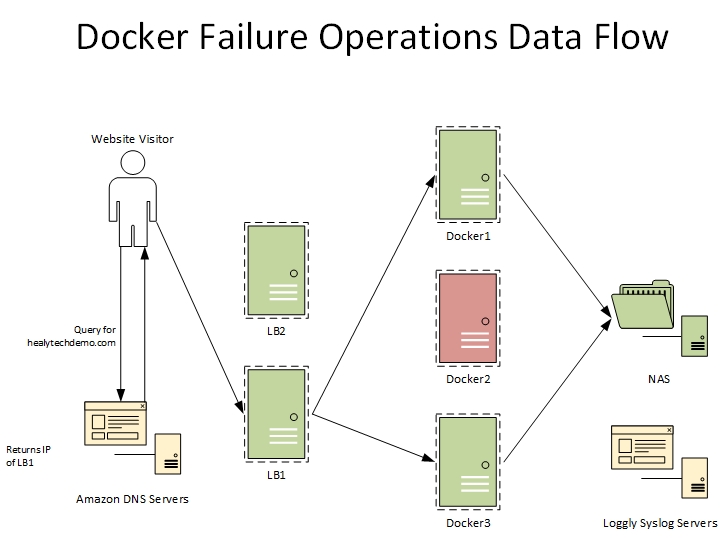
Failed Docker Server Data Flow
- Website Visitor queries website<x>.healytechdemo.com
- AWS DNS replies with IP of primary load balancer (LB1)
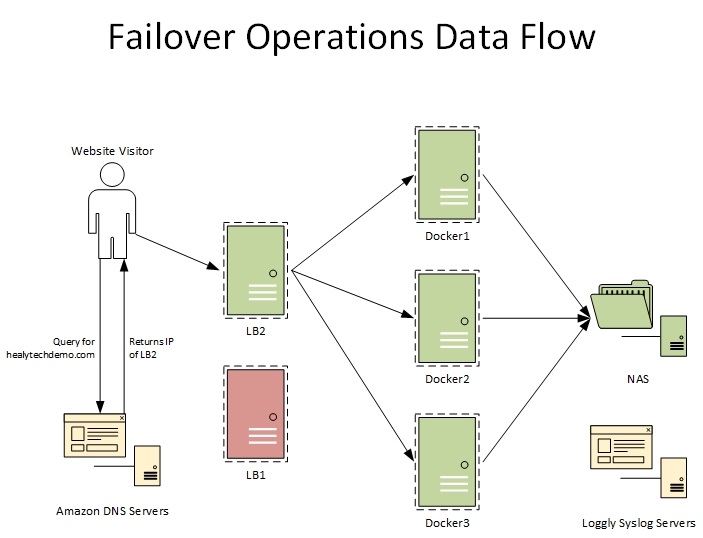
- Or LB2 if failed over
- Website Visitor directs HTTP to LB1
- LB1 proxies traffic to active Docker servers and not the individual failed Docker server
- Docker server proxies traffic on port 80 to Nginx container
- Nginx inspects header for virtual host and proxy pass to website container somewhere on Docker cluster
- Website container retrieves files from NAS and database from database container
Demo Goals
- Create 3 highly available (HA) WordPress websites
- Create 3-node Docker Swam cluster
- Create 2 HAProxy servers (load balancers)
- Create a reverse proxy
- Configure off-site syslogging
Other tasks performed prior to the demo:
- Create six (6) EC2 compute instances in AWS
- Transfer or purchase domain name in AWS Route 53
- Configure Hosted Zone information for domain in AWS Route 53
Global Configuration
- Install all updates
yum update -y
- Install basic programs
yum install nano wget curl zip unzip -y
- Add DNS entries to hosts file (DNS on next slide)
cat << EOT >> /etc/hosts
172.31.61.43 docker1 docker1.healytechdemo.com
172.31.63.213 docker2 docker2.healytechdemo.com
172.31.60.104 docker3 docker3.healytechdemo.com
172.31.56.139 nas nas.healytechdemo.com
172.31.60.57 LB1 LB1.healytechdemo.com
172.31.50.243 LB2 LB2.healytechdemo.com
EOT
- Disable SELinux & Reboot
sed -i 's/SELINUX=enforcing/SELINUX=disabled/g' /etc/selinux/config && reboot
DNS Information
| Hostname | Public IP | Private IP |
|---|---|---|
| docker1.healytechdemo.com | 18.209.26.6 | 172.31.61.43 |
| docker2.healytechdemo.com | 3.208.204.94 | 172.31.63.213 |
| docker3.healytechdemo.com | 3.93.113.36 | 172.31.60.104 |
| nas.healytechdemo.com | 3.95.70.36 | 172.31.56.139 |
| LB1.healytechdemo.com | 35.169.255.174 | 172.31.60.57 |
| LB2.healytechdemo.com | 35.174.95.113 | 172.31.50.243 |
Other DNS Entries
| URL | Record Type | Destination |
|---|---|---|
| aws-web-cluster.healytechdemo.com | A | Primary: IP of LB1 Failover: IP of LB2 |
| website1.healytechdemo.com | CNAME | aws-web-cluster.healytechdemo.com |
| website2.healytechdemo.com | CNAME | aws-web-cluster.healytechdemo.com |
| website3.healytechdemo.com | CNAME | aws-web-cluster.healytechdemo.com |
| registry.healytechdemo.com | CNAME | aws-web-cluster.healytechdemo.com |
Configure Load Balancers
- Install HAProxy
- Backup original config
- Insert basic HTTP config
- Configure Rsyslog
- Start services
- View HAProxy Stats webpage
- http://lb1.healytechdemo.com:8080/stats
- http://lb2.healytechdemo.com:8080/stats
- You can view it live too!
- View AWS Route53 Health Check
LB1&2>
yum install haproxy -y
mv /etc/haproxy/haproxy.cfg /etc/haproxy/haproxy.cfg.orig
cat << EOT >> /etc/haproxy/haproxy.cfg
global
    log         127.0.0.1 local2
    chroot      /var/lib/haproxy
    pidfile     /var/run/haproxy.pid
    maxconn     10000
    user        haproxy
    group       haproxy
    daemon
    stats socket /var/lib/haproxy/stats

listen haproxy3-monitoring *:8080
    mode http
    option forwardfor
    option httpclose
    stats enable
    stats show-legends
    stats refresh 5s
    stats uri /stats
    stats realm Haproxy\ Statistics
    stats auth healytech:password
    stats admin if TRUE
    default_backend PublicWebHTTP_backend

frontend PublicWebHTTP
    bind *:80
    mode http
    timeout client 30000
    timeout server 30000
    option http-server-close
    option forwardfor
    default_backend PublicWebHTTP_backend

backend PublicWebHTTP_backend
    balance roundrobin
    mode http
option httpchk HEAD / HTTP/1.1\r\nHost:\ localhost    #Check the server application is up and healty - 200 status code
    timeout connect 30000
    timeout server 30000
    retries 3
    server docker1 172.31.61.43:80 check inter 1000
    server docker2 172.31.63.213:80 check inter 1000
    server docker3 172.31.60.104:80 check inter 1000
EOT
sed -i 's/$ModLoad imudp/ModLoad imudp/g' /etc/rsyslog.conf
sed -i 's/$UDPServerRun 514/UDPServerRun 514/g' /etc/rsyslog.conf
cat << EOT >> /etc/rsyslog.d/haproxy.conf
local2.=info     /var/log/haproxy-access.log    #For Access Log
local2.notice    /var/log/haproxy-info.log      #For Service Info - Backend, loadbalancer
EOT
service rsyslog restart
service haproxy restart
chkconfig haproxy on
Configure NFS Server & Mount Shared Directory
- Install NFS Server
- Start NFS Server
- Create DATA directory
- Create test file (test.txt)
- Add DATA directory to list of NFS exports
- Export share
- Mount DATA on all Docker servers
nas>
yum install nfs-utils -y
service nfs-server start
chkconfig nfs-server on
mkdir /data
touch /data/test.txt
echo '/data *(rw,sync,no_root_squash,no_subtree_check)' > /etc/exports
exportfs –ra

docker1&2&3>
mkdir /data
ls /data
echo 'nas:/data /data nfs4 rw,sync,hard,intr,noatime 0 0' >> /etc/fstab
mount /data
ls /data
Configure Docker Servers & Swarm
- Install Docker
- Start Docker
- Test Docker
- Create Swarm
- Add remaining Docker servers to Swarm as managers
- Create Docker network
docker1&2&3>
yum install -y yum-utils device-mapper-persistent-data lvm2 -y
yum-config-manager --add-repo https://download.docker.com/linux/centos/docker-ce.repo
yum install docker-ce docker-ce-cli containerd.io -y
service docker start
chkconfig docker on
docker run hello-world

docker1>
docker swarm init
docker swarm join-token manager
# Copy docker join command

docker2&3>
# Paste docker join command from above

docker (any)>
docker network create -d overlay --attachable healydemo-overlay
Create Nginx Reverse Proxy
- Create directory for Nginx
- Copy /etc/nginx from container into DATA
- Create Docker Compose file (preconfigured)
- Deploy Nginx with Docker Stack
- View Nginx default page
- http://lb1.healytechdemo.com
- http://lb2.healytechdemo.com
- http://docker1.healytechdemo.com
- http://docker2.healytechdemo.com
- http://docker3.healytechdemo.com
docker(any)>
mkdir -p /data/services/nginx/app
docker run -v /data/services/nginx/app:/tmp/ nginx cp -R /etc/nginx /tmp
cat << EOT >> /data/services/nginx/docker-compose.yml
version: '3'
services:
  frontend:
    image: nginx:latest
    ports:
      - 80:80
    volumes:
      - /data/services/nginx/app/nginx:/etc/nginx
    networks:
      - healydemo-overlay
    deploy:
      replicas: 1
      resources:
        limits:
          memory: 128M
networks:
  healydemo-overlay:
    external: true
EOT
docker stack deploy nginx -c /data/services/nginx/docker-compose.yml
Create Websites
- Create directory for website1
- Create Docker Compose file (preconfigured)
- Deploy website1 with Docker Stack
- Inspect running Docker containers
- Repeat for website 2
- Repeat for website 3
- Inspect running Docker containers
docker(any)>
mkdir -p /data/services/website1/php/html
mkdir -p /data/services/website1/mysql/
cat << EOT >> /data/services/website1/docker-compose.yml
version: '3'
services:
  php:
    image: wordpress:latest
environment:
      WORDPRESS_DB_HOST: website1_mysql
      WORDPRESS_DB_USER: wp_user
      WORDPRESS_DB_PASSWORD: password4U
      WORDPRESS_DB_NAME: wp_db
    volumes:
      - /data/services/website1/php:/var/www/html
    networks:
      - healydemo-overlay
    deploy:
      replicas: 1
      resources:
        limits:
          memory: 128M
  mysql:
    image: mysql:5.7
    volumes:
      - /data/services/website1/mysql:/var/lib/mysql
    environment:
      MYSQL_USER: wp_user
      MYSQL_PASSWORD: password4U
      MYSQL_DATABASE: wp_db
      MYSQL_RANDOM_ROOT_PASSWORD: '1'
    networks:
      - healydemo-overlay
    deploy:
      replicas: 1
      resources:
        limits:
          memory: 256M
networks:
  healydemo-overlay:
    external: true
EOT
docker stack deploy website1 -c /data/services/website1/docker-compose.yml
Create Nginx Configurations
- Create Nginx config for website1
- Repeat for website2
- Repeat for website3
- Test Nginx config
- Reload Nginx config
- Visit each website and complete WordPress installation
- http://website1.healytechdemo.com
- http://website2.healytechdemo.com
- http://website3.healytechdemo.com
docker(any)>
cat << EOT >> /data/services/nginx/app/nginx/conf.d/website1.conf
server {
        listen 80;
        server_name website1.healytechdemo.com;
        location / {
                resolver 127.0.0.11 valid=10s;
                set \$upstream website1_php;
                proxy_pass http://\$upstream;
                proxy_set_header Host \$host;
                proxy_set_header X-Real-IP \$remote_addr;
                proxy_set_header X-Forwarded-Host \$host;
                proxy_set_header X-Forwarded-Server \$host;
                proxy_set_header X-Forwarded-For \$proxy_add_x_forwarded_for;
                proxy_set_header X-Forwarded-Proto \$scheme;
        }
}
EOT

# Backslashes are only used here because I’m running this from bash.
# The backslashes don’t exist in the Nginx config file
Configure Syslog
- Create directory for Logspout
- Create Docker Compose file (preconfigured)
- Deploy Logspout with Docker Stack
- Visit any website to generate traffic
- View traffic logs at loggly.com
docker(any)>
mkdir -p /data/services/logspout
cat << EOT >> /data/services/logspout/docker-compose.yml
version: "3"

networks:
  logging:

services:
  logspout:
    image: gliderlabs/logspout
    networks:
      - logging
    volumes:
      - /etc/hostname:/etc/host_hostname:ro
      - /var/run/docker.sock:/var/run/docker.sock
    environment:
      SYSLOG_STRUCTURED_DATA: "6bf9b8b0-98c4-4df1-a0d6-f1eccb21cf60@41058"
      tag: "aws-web-cluster"
    command: syslog+tcp://logs-01.loggly.com:514
    deploy:
      mode: global
EOT
docker stack deploy logspout -c /data/services/logspout/docker-compose.yml
Docker Failure Testing
- Inspect containers running on docker2 and note running website
- Using AWS EC2, shutdown docker2
- Visit website noted from above
- Inspect containers running on docker1 and docker3
- Inspect Docker nodes
- Using AWS EC2, startup docker2
- Inspect Docker nodes
docker2>
docker ls
# Note which website(s) may be running on this node

# Shutdown docker2 from AWS EC2

Docker1>
Docker ls

Docker3>
Docker ls
Docker node ls

# Startup docker2 from AWS EC2

Docker node ls


